Rabu, 25 Juni 2008

AutoCAD Tips & Tutorials

Keyboard shortcuts

Keyboard shortcuts can make your work go much faster. You can use the default keyboard shortcuts and create your own.

Here are the defaults that come with AutoCAD:

F1: Displays Help

F2: Toggles the Text Window

F3: Toggles OSNAP

F4: Toggles Tablet mode

F5: Toggles ISOPLANE

F6: Toggles Dynamic UCS

F7: Toggles GRID mode

F8: Toggles ORTHO mode

F9: Toggles SNAP mode

F10: Toggles Polar Tracking

F11: Toggles Object Snap Tracking

F12: Toggles Dynamic Input

CTRL+0: Toggles Clean Screen

CTRL+1: Toggles the Properties palette

CTRL+2: Toggles the DesignCenter palette

CTRL+3: Toggles the Tool Palettes Window

CTRL+4: Toggles the Sheet Set Manager

CTRL+6: Toggles the dbConnect Manager

CTRL+7: Toggles the Markup Set Manager

CTRL+8: Toggles the QuickCalc calculator palette

CTRL+9: Toggles the command window

CTRL+A: Selects all objects in the drawing

CTRL+SHIFT+A: Toggles Groups

CTRL+B: Toggles Snap mode

CTRL+C: Copies objects to Clipboard

CTRL+SHIFT+C: Copies objects to Clipboard with Base Point

CTRL+D: Toggles Dynamic UCS

CTRL+E: Cycles through isometric planes

CTRL+F: Toggles running object snaps

CTRL+G: Toggles the grid

CTRL+H: Toggles PICKSTYLE

CTRL+I: Toggles COORDS

CTRL+J; CTRL+M: Repeats the last command (pressing Enter does the same)

CTRL+L: Toggles Ortho mode

CTRL+N: Creates a new drawing

CTRL+O: Opens an existing drawing

CTRL+P: Prints/plots thecurrent drawing

CTRL+R: Cycles through layout viewports

CTRL+S: Saves the current drawing

CTRL+SHIFT+S: Opens the Save As dialog box

CTRL+T: Toggles TABLET mode

CTRL+V: Pastes data from the Clipboard

CTRL+SHIFT+V: Pastes data from the Clipboard as a Block

CTRL+X: Cuts objects to Clipboard

CTRL+Y: Cancels the preceding Undo action

CTRL+Z: Reverses the last action

CTRL+[; CTRL+\: Cancels the current command (pressing Esc does the same)

CTRL+PAGE UP: Moves to the next layout tab to the left of the current tab

CTRL+PAGE DOWN: Moves to the next layout tab to the right of the current tab

ALT+F11: Displays the Visual Basic Editor

ALT+F8: Displays the Macros dialog box

You can create your own keyboard shortcuts. See my tip, "Create a custom keyboard shortcut" for the detailed steps.

Creating custom keyboard shortcuts in CorelDRAW® X3

The preset keyboard shortcuts available in CorelDRAW® X3 help you complete commonly performed tasks faster. Did you know that you can become even more productive by creating custom keyboard shortcuts that suit your working style? For example, if you use the Bèzier tool often, you can assign a keyboard shortcut for activating the Bèzier tool.

To assign a keyboard shortcut to a command

1. Click Tools > Customization.

2. In the Customization list of categories, click Commands.

3. Click the Shortcut keys tab.

The Commands page of the Options dialog box lets you create custom keyboard shortcuts for commonly used menu commands and tools. Click the Shortcut keys tab to access the controls you need.

4. Choose a shortcut key table from the Shortcut key table list box.

5. Choose a command category from the top list box.

The top list box lets you choose a command category such as a menu, a toolbar, or the toolbox.

6. Click a command in the Commands list

In this example, we choose Toolbox from the top list box and Bèzier tool in the Commands list.

7. Click in the New shortcut key box, and press a key combination.

If the key combination is already assigned to another command, that command is listed in the Currently assigned to box.

8. Click Assign.

In this example, we assign Shift+D as the keyboard shortcut for activating the Bèzier tool.

Note: If the same keyboard shortcut is already assigned to another command, the second assignment overwrites the first. By enabling the Navigate to conflict on assign check box, you can automatically navigate to the command whose shortcut you reassigned and assign a new shortcut.

You can use keyboard shortcuts (also known as hotkeys) to quickly activate many menu commands and tools in CorelDRAW® X3. The keyboard shortcut for a menu command is displayed to the right of the menu item; the keyboard shortcut for a tool is displayed in a ToolTip when you hover over the tool.


This example shows the keyboard shortcut (Ctrl+N) for starting a new project.


This example shows the keyboard shortcut (F10) for activating the Shape tool.

Below are the keyboard shortcuts for some commonly performed tasks.

Task Keyboard shortcut
Open a file Ctrl+O
Save a file Ctrl+S
Import a file Ctrl+I
Export a file Ctrl+E
Print a file Ctrl+P

Note: For a complete list of keyboard shortcuts, see the CorelDRAW X3 Quick Reference Card included in your software package.

Shortcut Photoshop yang Sering Digunakan

Dalam modul ini kita akan membahas mengenai keyboard shortcut yang sering digunakan dan harus dikuasai dalam menggunakan Photoshop. Dengan menggunakan shortcut-shortcut ini kita dapat mempercepat proses kerja dan akan sangat memudahkan kita dalam bekerja.


Sebenarnya banyak sekali keyboard shortcut dalam aplikasi Photoshop namun kita tidak perlu menguasai semuanya. Yang perlu kita kuasai hanya yang paling sering kita gunakan saja.

Beberapa shortcut yang wajib kita kuasai tersebut antara lain :

Ctrl + Z / Ctrl + Alt + Z
Merupakan shortcut dari Undo yang digunakan untuk membatalkan perintah. Ctrl + Z untuk membatalkan perintah terakhir sedangkan Ctrl + Alt + Z untuk membatalkan sampai dengan 10 perintah terakhir.

Ctrl + D
Shortcut yang digunakan untuk mematikan seleksi/selection.

Ctrl + C
Merupakan shortcut untuk meng-copy obyek.

Ctrl + X
Merupakan shortcut untuk meng-cut obyek.

Ctrl + V
Merupakan shortcut untuk mem-paste obyek yang telah di-copy/di-cut.

Spasi
Merupakan shortcut dari Hand Tool yang digunakan untuk menggeser tampilan. Kemudian apa bedanya dengan apabila kita menekan tombol H yang merupakan shortcut dari Hand Tool? Misalnya saja kita sedang aktif pada Pen Tool kemudian kita ingin menggeser posisi dari tampilan gambar kita dan kita menekan tombol H maka kita akan aktif pada Hand Tool dan bukan pada Pen Tool lagi. Sedangkan apabila kita menggunakan tombol Spasi maka kita akan berpindah sementara pada Hand Tool (selama kita menekan tombol Spasi) namun tetap saja kita aktif pada Pen Tool dan setelah kita tidak menekan tombol Spasi lagi kita akan kembali pada Pen Tool.

Ctrl + Spasi + Drag
Digunakan untuk membesarkan tampilan pada area yang di drag.

Ctrl + Spasi + Klik / Ctrl + Spasi + Alt + Klik
Digunakan untuk membesarkan/mengecilkan tampilan secara bertahap.

Ctrl + “+” / Ctrl + “-”
Digunakan untuk membesarkan/mengecilkan tampilan.

Ctrl + 0
Digunakan untuk melihat tampilan gambar 100%.

F
Digunakan untuk mengganti screen mode menjadi Full Screen Mode. Dengan menggunakan Full Screen Mode akan mempermudah proses kerja kita terutama bila kita melakukan zooming dan sebagainya.

Tab
Digunakan untuk menyembunyikan alat-alat meliputi Toolbox, Window Layers, dan sebagainya. Biasanya kita menggunakannya bersamaan dengan Full Screen Mode.
Tombol “[” atau “]”
Digunakan untuk memperbesar/memperkecil ukuran brush dengan cepat.
Shortcut-shortcut yang telah disebutkan diatas tidak mutlak harus anda kuasai namun seiring dengan kebutuhannya, nantinya anda akan sangat terbantu menggunakan shortcut-shortcut tersebut.

These shortcuts are intended for Photoshop 7 and CS users.

File Menu

Action Keys
1. New Document 1. Ctrl+N
2. Open Document 2. Ctrl+O
3. Browse 3. Shift+Ctrl+O
4. Open As 4. Alt+Ctrl+O
5. Close 5. Ctrl+W
6. Close All 6. Ctrl+Shift+W
7. Save 7. Ctrl+S
8. Save As 8. Ctrl+Shift+S
9. Save a Copy 9. Ctrl+Alt+S
10. Save for Web 10. Ctrl+Alt+Shift+S
11. Page Setup 11. Ctrl+Shift+P
12. Jump to Image Ready 12. Ctrl+Shift+M
13. Exit 13. Ctrl+Q


Edit Menu

Action Keys
1. Undo 1. Ctrl+Z
2. Step Back (History) 2. Ctrl+Alt+Z
3. Step Forward (History) 3. Ctrl+Shift+Z
4. Cut 4. Ctrl+X
5. Copy 5. Ctrl+C
6. Copy Merged 6. Ctrl+Shift+C
7. Paste 7. Ctrl+V
8. Paste Into 8. Ctrl+Shift+V
9. Free Transform 9. Ctrl+T


Image Menu

Action Keys
1. Adjust Levels 1. Ctrl+L
2. Adjust Auto Levels 2. Ctrl+Shift+L
3. Adjust Auto Contrast 3. Ctrl+Alt+Shift+L
4. Adjust Curves 4. Ctrl+M
5. Adjust Color Balance 5. Ctrl+B
6. Adjust Hue/Saturation 6. Ctrl+U
7. Desaturate 7. Ctrl+Shift+U
8. Invert 8. Ctrl+I
9. Extract 9. Ctrl+Alt+X

Layer Menu

Action Keys
1. New Layer 1. Ctrl+Shift+N
2. Layer via Copy 2. Ctrl+J
3. Layer via Cut 3. Ctrl+Shift+J
4. Group with Previous 4. Ctrl+G
5. Bring to Front 5. Ctrl+Shift+]
6. Bring Forward 6. Ctrl+]
7. Send Backward 7. Ctrl+[
8. Send Back 8. Ctrl+Shift+[
9. Merge Layers 9. Ctrl+E
10. Merge Visible 10. Ctrl+Shift+E


Select Menu

Action Keys
1. Select All 1. Ctrl+A
2. Deselect 2. Ctrl+D
3. Reselect 3. Ctrl+Shift+D
4. Inverse 4. Ctrl+Shift+I
5. Feather 5. Ctrl+Alt+D


Filters Menu

Action Keys
1. Last Filter 1. Ctrl+F
2. Fade 2. Ctrl+Shift+F
3. Extract 3. Ctrl+Alt+X
4. Liquify 4. Ctrl+Shift+X
5. Pattern Maker 5. Ctrl+Shift+Alt+X


View Menu

Action Keys
1. Proof Colors 1. Ctrl+Y
2. Zoom In 2. Ctrl++
3. Zoom Out 3. Ctrl+-
4. Zoom In & Resize Window 4. Ctrl+Alt++
5. Zoom Out & Resize Window 5. Ctrl+Alt+-
6. Actual Pixels 6. Ctrl+Alt+0
7. Show/Hide Target Path 7. Ctrl+Shift+H
8. Show/Hide Rulers 8. Ctrl+R
9. On/Off Snap 9. Ctrl+Shift+;
10. Show/Hide Extras 10. Ctrl+H
11. Lock Guides 11. Ctrl+Alt+;
12. Show Guides 12. Ctrl+;
13. Show Grid 13. Ctrl+'

Misc. Shortcuts

Action Keys
1. Fill with Forground Color 1. Alt+Backspace
2. Fill with Background Color 2. Shift+Backspace
3. Ascend through Layers 3. Alt+]
4. Descend through Layers 4. Alt+[
5. Select Top Layer 5. Shift+Alt+]
6. Select Bottom Layer 6. Shift+Alt+[
7. Show/Hide All Palettes 7. Tab

Selasa, 24 Juni 2008

Tables are a new AutoCAD object that is can be created and customized by the user. Tables can be used for parts lists, revision history and time you need to organize text.

COMMAND

KEYBOARD

ICON

MENU

DESCRIPTION

Table

TABLE
Distance Icon

Draw > Tables...

Creates and inserts a new table.

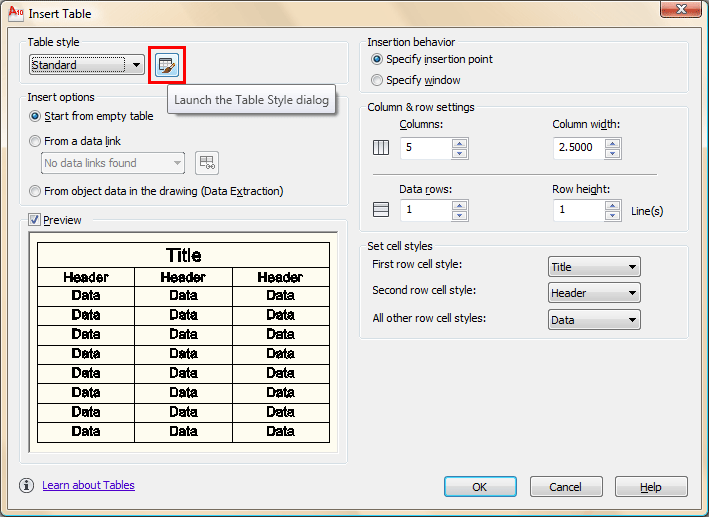
Start the command and you will see this dialog box.

Insert table Dialog Box

The labels look pretty straightforward - you can define the number of rows, columns, row height, column width and press OK. Or......you could press on the button circled above to open up the Table Style dialog box.

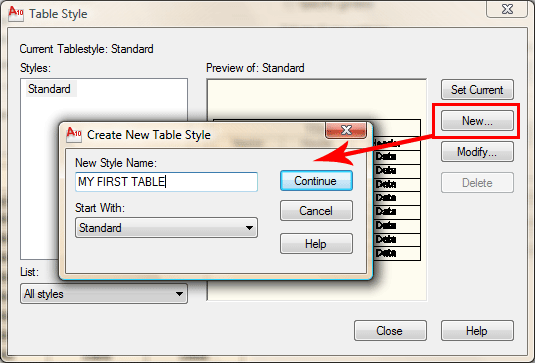
Create New Table

This allows you to create your own table style - sorry, just had to state the obvious. Give the new style a name and press "Continue".

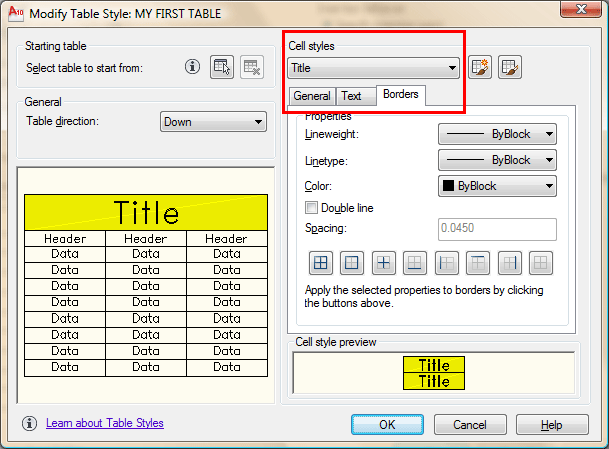
Table Style

Here, you can define the parameters (color, text height, borders, etc.) in your new custom style. This preview is used in the other dialog boxes as well. Make sure you have your Text Styles defined first.

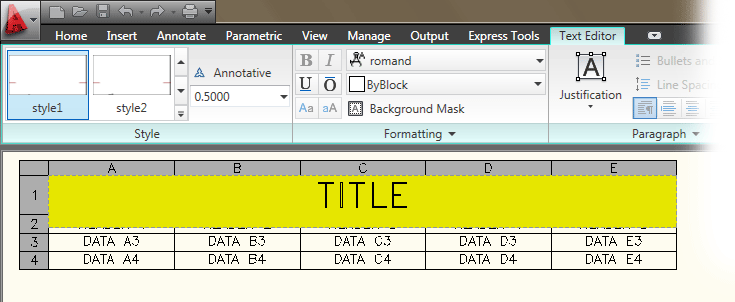
So now that you have defined your table style, you can insert one into the drawing and enter data using the Mtext editor and tabbing through the cells. Anyone who has used a simple spreadsheet will be able to use this. One major drawback is that there is no formula function in the table.

Formatted table in AutoCAD

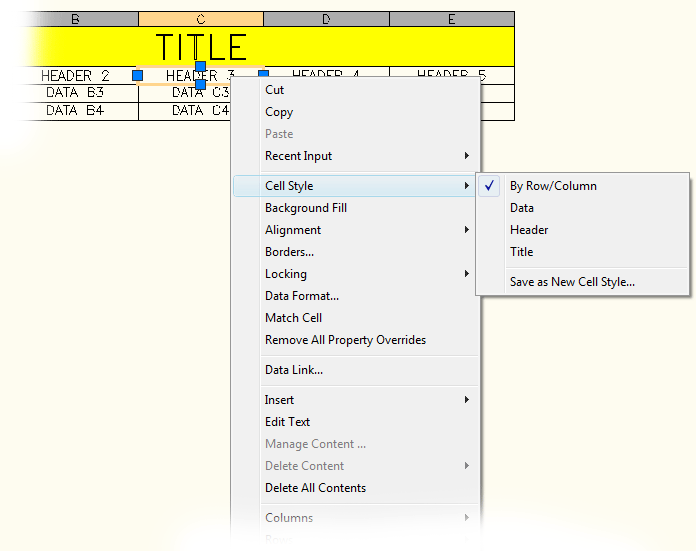
Once the table is in the drawing, you can double-click in any cell to edit it or right click it for more options:

Right-clicking a table in AutoCAD 2007

What once used to be a very tedious task in AutoCAD has become easy with this new tool. You also have the ability to copy styles from one table to another to add consistency to your drawing. Practice creating a table or two.

AutoCAD Tips & Tutorials

Keyboard shortcuts

Keyboard shortcuts can make your work go much faster. You can use the default keyboard shortcuts and create your own.

Here are the defaults that come with AutoCAD:

F1: Displays Help

F2: Toggles the Text Window

F3: Toggles OSNAP

F4: Toggles Tablet mode

F5: Toggles ISOPLANE

F6: Toggles Dynamic UCS

F7: Toggles GRID mode

F8: Toggles ORTHO mode

F9: Toggles SNAP mode

F10: Toggles Polar Tracking

F11: Toggles Object Snap Tracking

F12: Toggles Dynamic Input

CTRL+0: Toggles Clean Screen

CTRL+1: Toggles the Properties palette

CTRL+2: Toggles the DesignCenter palette

CTRL+3: Toggles the Tool Palettes Window

CTRL+4: Toggles the Sheet Set Manager

CTRL+6: Toggles the dbConnect Manager

CTRL+7: Toggles the Markup Set Manager

CTRL+8: Toggles the QuickCalc calculator palette

CTRL+9: Toggles the command window

CTRL+A: Selects all objects in the drawing

CTRL+SHIFT+A: Toggles Groups

CTRL+B: Toggles Snap mode

CTRL+C: Copies objects to Clipboard

CTRL+SHIFT+C: Copies objects to Clipboard with Base Point

CTRL+D: Toggles Dynamic UCS

CTRL+E: Cycles through isometric planes

CTRL+F: Toggles running object snaps

CTRL+G: Toggles the grid

CTRL+H: Toggles PICKSTYLE

CTRL+I: Toggles COORDS

CTRL+J; CTRL+M: Repeats the last command (pressing Enter does the same)

CTRL+L: Toggles Ortho mode

CTRL+N: Creates a new drawing

CTRL+O: Opens an existing drawing

CTRL+P: Prints/plots thecurrent drawing

CTRL+R: Cycles through layout viewports

CTRL+S: Saves the current drawing

CTRL+SHIFT+S: Opens the Save As dialog box

CTRL+T: Toggles TABLET mode

CTRL+V: Pastes data from the Clipboard

CTRL+SHIFT+V: Pastes data from the Clipboard as a Block

CTRL+X: Cuts objects to Clipboard

CTRL+Y: Cancels the preceding Undo action

CTRL+Z: Reverses the last action

CTRL+[; CTRL+\: Cancels the current command (pressing Esc does the same)

CTRL+PAGE UP: Moves to the next layout tab to the left of the current tab

CTRL+PAGE DOWN: Moves to the next layout tab to the right of the current tab

ALT+F11: Displays the Visual Basic Editor

ALT+F8: Displays the Macros dialog box

You can create your own keyboard shortcuts. See my tip, "Create a custom keyboard shortcut" for the detailed steps.

Sabtu, 21 Juni 2008

Here I will teach you about Photoshop-Aircraft-Gun-Animation-Tutorial


[1]-First of all Open any image of Gun as I did take following image

Pun318-Photoshop-Aircraft-Gun-Animation-Tutorial1

[2]-NOw make duplicate Layer with the help of Ctrl+J & then go to Blending Options with click on ‘f’ which is indicating by Hand sign

Pun318-Photoshop-Aircraft-Gun-Animation-Tutorial2

[3]-Now select Inner Shadow & use the following settings
Photoshop Technique-How to use the Inner Shadow feature

Pun318-Photoshop-Aircraft-Gun-Animation-Tutorial3

[4]-Now your image should look as shown below

Pun318-Photoshop-Aircraft-Gun-Animation-Tutorial4

[5]-Now Open New Layer & then create the following selection with the help of Polygonal Lasso Tool

Pun318-Photoshop-Aircraft-Gun-Animation-Tutorial5

[6]-Now fill the selection with fff200 color & then go to Select>Modify>Contract & use the following settings

Pun318-Photoshop-Aircraft-Gun-Animation-Tutorial6

[7]-Now your image should look as shown below

Pun318-Photoshop-Aircraft-Gun-Animation-Tutorial7

[8]-Now fill the selection with # f7941d color & then go to Filter>Blur>Gussian Blur & use the following settings

Pun318-Photoshop-Aircraft-Gun-Animation-Tutorial8

[9]-Now your image should look as shown below

Pun318-Photoshop-Aircraft-Gun-Animation-Tutorial9

[10]-Now press Ctrl+J & create the following Transformation with the help of Ctrl+T & then ENTER

Pun318-Photoshop-Aircraft-Gun-Animation-Tutorial10

[11]-Now your image should look as shown below

Pun318-Photoshop-Aircraft-Gun-Animation-Tutorial11

[12]-Now go to Image Ready with the help of Ctrl+Shift+M & then go to WINDOW>ANIMTION & make 2 Duplicate Frame with the help
of 2 Times click on following sign which is indicating by Hand sign

Pun318-Photoshop-Aircraft-Gun-Animation-Tutorial12

[13]-Now select Frame-1 & hide the following Layers

Pun318-Photoshop-Aircraft-Gun-Animation-Tutorial13

[14]-Now your image should look ash shown below

Pun318-Photoshop-Aircraft-Gun-Animation-Tutorial14

[15]-Now select Frame-2 & hide the following Layers with the help of Remove EYE sign which is indicating by Hand sign

Pun318-Photoshop-Aircraft-Gun-Animation-Tutorial15

[16]-Now your image should look as shown below

Pun318-Photoshop-Aircraft-Gun-Animation-Tutorial16

[17]-Now select Frame-3 & then Hide the following Layers

Pun318-Photoshop-Aircraft-Gun-Animation-Tutorial17

[18]-Now your image should look as shown below

Pun318-Photoshop-Aircraft-Gun-Animation-Tutorial18

[19]-Now Play the Animation with the help of click on following Button which is indicating by Hand sign

Pun318-Photoshop-Aircraft-Gun-Animation-Tutorial19

[20]-Now go to FILE>SAVE OPTAMIZED AS.. & use the following settings

Pun318-Photoshop-Aircraft-Gun-Animation-Tutorial20

[21]-Thanks for read this Photoshop Tutorial.I hope U have enjoyed & the Final Output of this tutorial is shown below

Pun318-Photoshop-Aircraft-Gun-Animation-Tutorial21

65 photoshop lightning tutorial
65 photoshop metal tutorial

Selasa, 17 Juni 2008

Instalasi Pada Server Billing

Saya anggap aplikasi webserver PHP dan MySQL telah dapat berjalan baik pada komputer yg akan dijadikan server billing.

Buat direktori khusus untuk billing ini di direktori web server anda. Pada beberapa varian distro biasanya root webnya ada di /var/www/html/ dan untuk user direktorinya ada di /home/[user]/public_html.

OK, untuk contoh kali ini saya contohkan billing di install di direktori user yang dapat diakses lewat web, yakni di /home/budi/public_html

copy file BiOS-v1.1.tar.bz2

extract

tar jxvf BiOS-v1.1.tar.bz2

maka di /home/budi/public_html akan terbentuk direktori billing.

pindah ke direktori billing

cd billing

Kita buat database untuk billing ini. Dalam contoh ini saya buat database dengan nama "bios".
Perintah di console:
$ mysqladmin -u root -p create bios

Import table database yang tersimpan di file bios.sql ke database mysql Anda. Perintahnya:
$ mysql -u root -p bios <>

(sesuaikan root dengan username mysql, dan bios dengan nama database yang anda inginkan)

selanjutnya edit file: bios-config.php
Anda cukup mengubah variabel ini:
mysql_user
mysql_pass
mysql_dbname
url_location.

Sesuaikan dengan setting di sistem anda.

Contoh:
$mysql_user='root'; --> user mysql
$mysql_pass='tes123'; --> pass mysql
$mysql_dbname='bios'; --> nama database yg tadi dibuat
$url_location='http://192.168.1.25:80/~budi/billing/'; --> url lokasi billing

Selanjutnya buka browser dan akses url_location yang sudah di set diatas (sesuaikan dengan alamat web server billing anda)
Contoh: http://192.168.1.25:80/~budi/billing/operator.php

Apabila muncul tampilan seperti Gambar 01, maka instalasi bisa dibilang berhasil :)


Gambar 01.

Untuk user dan password default administrator adalah:
username: admin
password: tes123

seharusnya kini Anda akan melihat tampilan welcome page seperti Gambar 02


Gambar 02. Welcome Page..


Klik menu SETTING (lihat Gambar 03)


Gambar 03. Halaman Setting / Pengaturan

Ubah nama warnet, dan alamat dengan nama warnet Anda. MOTD dengan pesan yang ingin Anda tampilkan di komputer client.
Set sistem operasi yang dipakai operator ke GNU/Linux bila Anda menggunakan Linux.

Pada bagian Harga, set harga sewa per jam warnet Anda. Default Rp. 3000 / jam. Set pada minimum pemakaian dengan biaya minimal yang harus dibayarkan client untuk dapat bermain di warnet Anda. Default Rp. 100. Set dengan Rp. 0, bila tidak ada minimum pemakaian. Ubah charge pemakaian setiap 1 detik ke nilai lain bila Anda tidak ingin mencharge pemakaian per detik. Misal Anda ingin mengenakan charge pemakaian tiap 5 menit awal, maka ubah variabel ini menjadi 5 x 60 detik = 300 detik.

Pada bagian Sekuriti, masukkan ip yang berhak mengakses aplikasi operator.php. Untuk banyak ip pisahkan dengan tanda |. Contoh: 192.168.1.25|127.0.0.1|222.222.222.222. Kosongkan apabila Anda ingin mengijinkan semua ip dapat mengakses operator.php.

Pada bagian Screenshot, ubah resolusi dengan resolusi screenshot yg Anda inginkan. Defaultnya 640x480 pixel, jpg. Ubah screenshot name dan folder dengan nama file screenshot dan nama folder di home direktori client dimana screenshot akan disimpan. Folder di client ini nantinya akan dishare dengan memanfaatkan protokol samba. Nama file Misal .screen.jpg (awalan . akan membuat file/direktori tersebut menjadi hidden).
logikanya file screenshot nanti akan diakses melalui: smb://ip_client/.bios-dir/.screen.jpg

Untuk protokol file sharing lain silahkan set manual di kolom yang tersedia. Saat Anda mengeset "Sistem operasi yang dipakai operator" dengan GNU/Linux maka otomatis default protocol yg dipakai adalah samba (smb://ip_client) atau bila Windows otomatis menggunakan (file:////ip_client)

Pada bagian Remote Access, ubah "Client default login username /SSH" dengan username client linux Anda. Untuk itu silahkan samakan user name untuk seluruh client warnet Anda. Untuk password antar client boleh beda.


Klik menu CLIENT (lihat Gambar 04)


Gambar 04. Halaman pengaturan

Di bagian ini Anda dapat melakukan tambah/kurang/edit/delete komputer client di warnet yang berhak mengakses program billing. Silahkan masukkan Nama client, IP client (IP Statis), dan Desktop yang digunakan. Untuk desktop ada 4 pilihan saat ini, yakni KDE, GNOME, XFCE dan Windows. Namun yang benar-benar sudah fully compatible adalah desktop KDE. Untuk tiga lainnya masih dalam tahap pengembangan khususnya pada fitur logout.


Klik menu Operator (lihat Gambar 05)


Gambar 05. Halaman operator

Pada bagian ini Anda dapat menambah user lain yang dapat mengakses aplikasi operator.php namun dengan hak akses dibawah level user admin. Alias anda dapat menambah user untuk operator / pegawai warnet Anda.
Adapun operator selain admin (selain yang ID nya 1) hanya dapat melihat menu Index, Billing, dan Laporan. Laporan juga terbatas hanya dapat melihat transaksi yang ada selama yang bersangkutan sedang bertugas. Tidak dapat melihat laporan operator lainnya.

Untuk menambahkan cukup dengan mengisi:
Nickname --> akan menjadi user login
Nama lengkap --> akan tercetak pada struk billing
Password --> password login
Dapat mengedit laporan hariannya --> Defaultnya TIDAK. artinya yang bersangkutan tidak dapat mengedit laporan transaksi yang terjadi (misal hapus transaksi, atau mengubah nilai transaksi)
.


Instalasi Pada Client

Frontend pada client memanfaatkan browser Firefox. Silahkan setting browser Firefox.
Buka Firefox. Pada kolom URL ketikkan "about:config"

Pada isian Filter ketik: signed.applets.codebase_principal_support
Set value menjadi true
Selanjutnya, filter : browser.sessionstore.enabled
Set value menjadi false

maksud signed.applets.. adalah agar jendela firefox bisa kita atur panjang lebar nya otomatis lewat script dalam program billing. Untuk browser.session di disable. Tujuannya untuk mencegah firefox merestore session yang disimpan sesaat sebelum browser di close mendadak saat komputer client di logout/reboot.

Selanjut silahkan tes dengan membuka url: http://ip_server/lokasi_file_client.php
contoh: http://192.168.1.25:80/billing/client.php dari firefox di client

Bila ada muncul pertanyaan berkaitan security, jangan lupa beri centang pada bagian dont ask again, supaya tidak ditanya2 lagi. (Lihat Gamba 06);


Gambar 06. Security

Apabila IP client sebelumnya telah didaftarkan di menu client (operator.php), billing seharusnya akan mulai menghitung dengan penampilan seperti pada Gambar 07.


Gambar 07. Tampilan di Client

Anda sebagai operator / admin dapat memantau penggunaan billing secara realtime lewat operator.php pada menu Billing. Lihat Gambar 08

Gambar 08. Billing

OK sampai tahap ini, proses instalasi sudah mencapai 70% :)


Instalasi Lanjut pada Server dan Client

Pastikan pada komputer server telah terpasang paket openssh. Secara defacto paket ini mestinya sudah ada di setiap distro linux. Paket ini digunakan oleh billing untuk melakukan remote access via SSH.

Silahkan login sebagai user root pada komputer server, dari console ketikkan perintah:

$ su
(password root)

Edit file /etc/ssh/ssh_config

misal pakai aplikasi joe

# joe /etc/ssh/ssh_config

Edit variable - variable yg ada sehingga nilainnya menjadi:

ForwardAgent yes
Protocol 2,1
Host *
#ForwardX11 yes --> didisable

pindah ke direktori root

# cd

jalankan perintah:

Jalankan:

# ssh-keygen -t rsa

nanti otomatis akan ada 2 file tersimpan di /root/.ssh

# ls /root/.ssh
id_rsa id_rsa.pub

Kedua file ini nantinya digunakan sebagai otentikasi untuk mengakses secara remote client via protokol ssh tanpa perlu menggunakan password.

Silahkan Anda copy (misal ke flashdisk) file id_rsa.pub. Lalu copykan ke masing - masing root client.
Copykan ke folder .ssh di /root direktori masing-masing client. copy ke /root/.ssh/ (INGAT! BUKAN di Home direktori user!)
Apabila folder .ssh belum ada silahkan di create dulu.

Jangan lupa ubah copy-an file tersebut dengan nama authorized_keys

lalu ubah permission nya menjadi 600
# chmod 600 authorized_keys

Masih di komputer client, edit file /etc/ssh/sshd_config
Ubah variabel yang ada sehingga menjadi:
RSAAuthentication yes

REBOOT komputer client Anda. Setelah REBOOT, lanjutnya ke langkah dibawah ini.

Selanjutnya silahkan lakukan testing dari komputer server. login sebagai root, dan dari console ketikkan perintah:
# ssh -l root 192.168.1.16

Ubah ip dengan ip client Anda. Seharusnya anda bisa langsung login ke ip 192.168.1.16 tanpa perlu memasukkan password.

OK sampai sini proses instalasi udah 80% :)

Kembali ke komputer server.
Apabila Anda menggunakan webserver apache, pastikan Anda memasukkan user apache kedalam file sudo (/etc/sudoers)

Caranya: login sebagai root, dari console ketikkan: # visudo

ketikkan tombol i, untuk perintah insert

tambahkan:
apache ALL=(ALL) ALL

tekan tombol "shift" + ":"

Akan muncul : dibagian bawah. Ketik wq, untuk write lalu quit

Apabila berhasil seharusnya akan muncul seperti dibawah ini:
wrote /etc/sudoers.tmp, 32 lines, 740 chars
root@~#Buat file ini dari user root

Apabila Anda menggunakan webserver selain apache, seperti lighttpd, maka edit file /etc/lighttpd/lighttpd.conf
isikan pada bagian username dan groupname dengan username tempat billing diletakkan
(dalam hal ini karena billing disimpan di /home/budi/) maka user dan group diisi budi.
## change uid to (default: don't care)
server.username = "budi"

## change uid to (default: don't care)
server.groupname = "budi"

untuk kasus ini karena webserver menggunakan user budi, maka yang dimasukkan dalam file sudo (/etc/sudoers) adalah user budi

#visudo
tambahkan:
budi ALL=(ALL) ALLBuat file ini dari user root

OK Instalasi kini sudah 90%. Dan seharusnya kini Anda sudah dapat mematikan (poweroff), reboot, logout (khusus KDE) dan show up (memunculkan billing di client) secara remote langsung dari aplikasi operator.php

Untuk fitur screenshot pastikan koneksi samba antara komputer server dan client berjalan baik.
Silahkan buat direktori di home direktori user client anda dengan nama sesuai dengan yang anda setting di operator.php > setting
Dalam contoh ini nama foldernya dan nama sharingnya adalah .bios-dir (lihat gambar dibawah untuk petunjuk lengkap step-by step menshare sebuah folder)


Masih di komputer client, cek apakah file aplikasi ini ada (login sebagai root)

# locate xwd
# locate dcop

bila ditemukan dan lokasinya tidak di /usr/bin/ misal di:
/usr/bin/X11/xwd
/opt/kde/bin/dcop

maka silahkan anda buat symbolic link alias shortcut file ini di /usr/bin

caranya ketik perintah di bawah ini:
# ln -s /usr/bin/X11/xwd /usr/bin/xwd
# ln -s /opt/kde/bin/dcop /usr/bin/dcop

(cat: ubah /usr/bin/X11/xwd sesuai dengan lokasi file xwd berada)

OK silahkan Anda coba dari operator.php, klik pada logo komputer client. Seharusnya kini Anda dapat melihat tampilan screenshot nya :) Untuk hasil optimal gunakan browser konqueror bawaan kde yang sudah support protokol smb://
Lihat Gambar 09

OK Instalasi kini sudah 95%

Supaya 100% Anda kini tinggal membuat shortcut di desktop pada tiap-tiap komputer client agar dapat membuka file client.php secara manual dengan firefox. Caranya anda tinggal buat shortcut di desktop. Lalu isi linknya dengan argumen:
firefox http://192.168.1.25/~budi/billing/client.php

sesuaikan alamat url dengan milik anda
dan supaya billing otomatis berjalan (autorun) saat client login, anda cukup membuat script sederhana di folder .kde/Autostart/ di home client anda. Contoh file script ini dapat Anda lihat di file billing.sh

misal beri nama billing.sh

isinya:
#!/bin/sh

#BiOS - billing open source baliwae
#(c)2005-2008 Budi Baliwae
#http://bios.baliwae.com

exec firefox http://192.168.1.25:80/~budi/billing/client.php

supaya shortcut billing.sh ini tidak dapat dihapus dan diedit oleh user, silahkan ubah own dan permission dari folder Autostart dan file billing.sh
menjadi
# chown root Autostart
# chgrp root Autostart
# chmod 755 Autostart
# cd Autostart
# chown root billing.sh
# chgrp root billing.sh
# chmod 755 billing.sh

OK satu lagi .. Bila client menggunakan KDE, jangan lupa untuk menonaktifkan fitur restore session. Caranya ubah dari control panel KDE. lihat Gambar!

dan terakhir :D silahkan replace file logo di direktori img/LOGO-WARNET.png dengan logo warnet Anda.

Name:*

Email Address:*

Feedback: