Senin, 26 Mei 2008

Tutorial SetUp Telkomnet Instant

1. Pastikan kabel telpon anda sudah terhubung ke modem pada komputer.

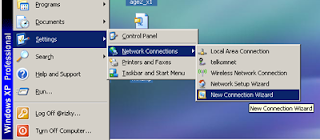
2. Untuk memulai setup Pilih menu start -> setting -> pilih "Network connection" -> Lalu plih "Network connection wizard"


3. Anda akan dipertemukan dengan dialog box pertama yang bernama "Welcome to the new connection wizard" ,disini anda bisa langsung klick tombol "Next" untuk memasuki langkah berikutnya.


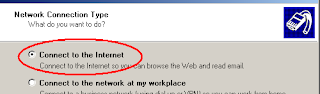
4. Pada langkah ini pilih "Connect to the internet" dan langsung pilih tombol "next" untuk ke langkah berikutnya.


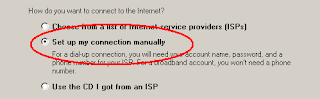
5. Di langkah ini pilih " set up my connection manually" itu menandakan bahwa anda akan men-set semua konfigurasi telkomnet dengan mengisinya sendiri. pilih "next" untuk ke langkah berikutnya.


6. Disini tentukan tipe koneksi internet anda. Karena kita akan menggunakan koneksi dial up , maka pilih "Connect using a dial-up modem" dan pilih "next" jika ingin ke langkah berikutnya.


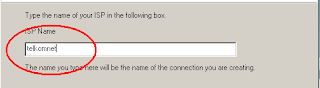
7. Pada pilihan ini isi nama penyedia jasa layanan internetnya (ISP - Internet Service Provider). Karena kita menggunakan telkom isi saja "telkomnet", sebenarnya nama ini bebas diisi cuma agar memudahkan kita bahwa koneksi ini bernama telkomnet.


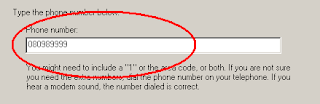
8. Pada menu ini kita diminta untuk mengisikan nomor telpon ISPnya. isikan saja 080989999 di text box itu nomor yang digunakan telkomnet. Pilih "next" untuk ke langkah berikutnya.


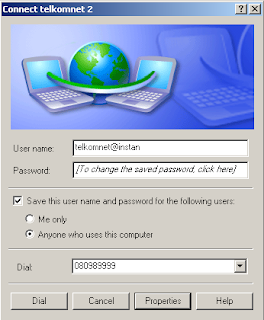
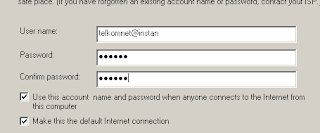
9. Langkah kita hampir selesai...nah disinilah username dan password diisi. Isikan data berikut:

- username : telkomnet@instan

- Password : telkom

- Confirm Password : telkom

- Beri tanda √ pada pilihan pertama bagi anda yang ingin koneksi telkomnet ini digunakan untuk semua pengguna komputer di tempat anda.

- Beri tanda √ pada pilihan ke dua bagi anda yang ingin menjadikan koneksi telkomnet ini menjadi koneksi "default" dikomputer anda. (menjadi koneksi dominan)

Pilih "next" untuk ke langkah berikutnya...


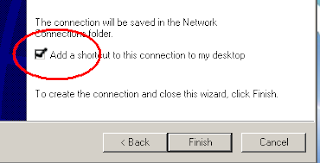
10. Disinilah proses set up selesai, untuk terakhir kalinya anda diminta apa ingin meletakkan icon koneksi telkomnet di desktop atau tidak. Saya sarankan beri tanda centang saja jadi untuk mempermudah anda untuk melakukan koneksi ke internet lewat desktop. Pilih "finish" untuk selesai set up


11. Tampilan koneksi akan seperti ini anda bisa langsung ber internetan dengan memilih tombol "Dial".

SETTING MODEM ALLIED TELESYN AT-AR236E

Langkah 1:
Klik Start => Control Panel

Langkah 2 :
Double klik Network Connection icon

Langkah 3 :
double klik pada Local Area Connection icon kemudian klik Properties


Langkah 4:
pilih Internet Protocol (TCP/IP) dan klik Properties

Langkah 5 :
pilih Obtain an IP address automatically and Obtain DNS server address automatically, kemudian klik OK

Langkah 6 :
masukkan alamat web Port ADSL 2/2 Router’s default IP address : ”192.168.1.1” pada kotak Address, kemudian tekan enter

Langkah 7 :
masukkan Username :manager dan Password : friend, kemudian klik Log In


Langkah 8 :
setelah Log In, anda akan masuk pada ALLIED TELESYN AT-AR236E’s Home

Langkah 9 :
Klik Advanced → WAN → ADSL modulation

Langkah 10 :
pada layar akan muncul tampilan berikut:

Pada Modem Setup, pilih settingan ADSL_G.dmt, klik Apply

Klik Advanced → WAN → New Connection


Langkah 11 :

pada layar akan muncul tampilan berikut:

.Kolom Name diisi, misal antik
.Kolom Type, pilih settingan PPPoE
.Kolom username diisi nomer speedy diikuti @telkom.net, misalnya 141406100439@telkom.net VPI : 8, VCI : 81
.Kolom password diisi sesuai dengan password yang diperoleh
.Klik Apply
.Klik Save Settings

Langkah 12 :
pada layar akan muncul tampilan berikut:

Klik OK
Klik Status
Klik Connection Status

Langkah 13 :
Modem ALLIED TELESYN sudah connect dan siap melakukan browsing dengan memasukkan alamat web pada kolom Address, misalnya www.google.com, www.friendster.com, www.jobkerja.blogspot.com

SETTING MODEM SANEX

Langkah 1:
klik Start => Control Panel


Langkah 2 :
Double klik Network Connection Icon

Langkah 3 :
double klik pada Local Area Connection kemudian pilih General dan klik Properties


Langkah 4 :
pilih Internet Protocol (TCP/IP) dan klik Properties

Langkah 5 :
Pilih Obtain an IP address automatically and Obtain DNS server address automatically, kemudian klik OK
Langka 6 :
Masukkan alamat web Port ADSL 2/2 Router’s default IP address : ”192.168.1.1” pada kotak Address, kemudian tekan enter.


Langka 7 :
Masukkan Username : admin dan Password admin, kemudian klik OK

Langka 8 :
Setelah Log In, anda akan masuk pada SANEX’s Home

Klik Advanced Setup => Klik Edit

Kolom VPI diisi 8
Kolom VCI diisi 81, kemudian klik Next

Pilih settingan PPP over Ethernet (PPPoE) pada Connection Type => klik Next

Kolom username diisi nomer speedy diikuty @telkom.net, misalnya 111212223244@telkom.net
Kolom Password diisi sesuai dengan password yang diperoleh => Next

Klik Next
Klik Save
Klik Save/Reboot

Untuk memastikan apakah modem sudah connect atau belum, klik Device Info

Ada tulisan This information reflects the current status of your DSL connection.
modem SANEX telah berhasil di install

Langkah 9:
modem SANEX sudah connect dan siap melakukan browsing dengan memasukkan alamat web pada kolom Address, misalnya www.google.com, www.friendster.com, www.jobkerja.blogspot.com

Windows XP Internet Connection Firewall

Windows XP's Internet Connection Firewall (ICF) protects your network against undesired incoming traffic from the Internet -- everything from casual port scans by bored teenagers to serious break-in attempts by determined hackers. ICF creates a protective barrier between your network and the Internet, only passing through traffic that you've requested.

You can enable or disable ICF separately on each dial-up, LAN, or high-speed Internet connection in the Network Connections folder. That's good, because there are some connections that can benefit from ICF, and some that must not use it.

Here are some points to ponder when deciding whether to use ICF on your network connections.

WARNING #1: As its name implies, the Internet Connection Firewall is for use ONLY on a direct connection to the Internet, such as a dial-up, DSL, or cable modem. If your computer gets its Internet connection through a software router (like Internet Connection Sharing) or a hardware router, you don't have a direct connection and must not enable ICF.

WARNING #2: If the Internet Connection Firewall is enabled on a local area network connection with other computers, it will block File and Printer Sharing. This is probably the most common problem in Windows XP networking.

WARNING #3: ICF is only effective against undesired incoming traffic from the Internet. It can't stop undesired outgoing traffic from spyware, Trojan horse programs, or other hacker tools. If you want outgoing protection, use a firewall that offers that capability, and disable ICF on all connections.

WARNING #4: To enable or disable ICF, you must be logged on as a user that is a member of the Administrators group.

Enabling and Disabling the Internet Connection Firewall

To enable ICF on an Internet connection, open the Network Connections folder, right click the desired connection, and click Properties.

The Properties sheet shows the network components associated with the connection.

Click the Advanced tab, then check Protect my computer and network by limiting or preventing access to this computer from the Internet.

If the firewall is enabled and you want to disable it, un-check the same box.

Windows XP asks you to confirm your decision to disable the firewall. Click Yes to disable it.

Internet Connection Firewall Security Log

By default, ICF silently discards all undesired incoming traffic. To see a record of its activity, you can enable security logging.

Open the Advanced tab of the network connection's properties and click Settings.

Click Security Logging to bring up the logging options.

To see messages about discarded traffic, check Log dropped packets. On a cable modem connection, it's common to see several dozen of these messages every day.

To see messages about permitted traffic, check Log successful connections. Selecting this option can cause the log file to grow very large very quickly. To limit its size, enter a number in the Size limit box.

By default, the security log is written to file pfirewall.log in the Windows folder. To change the file name, enter a new name in the Name box, or click the Browse button and browse to the new file.

For information on how to read and interpret the security log, click Learn more about Internet Connection Firewall on the Advanced tab.

Name:*

Email Address:*

Feedback: